Guide to creating your auto-responder
In Part 1 of this post, we will guide you in creating an auto-responder using your cPanel.
Many of us have web/email hosting that comes with cPanel but not many of us actually login to use it much.
One of the most-used/useful feature is the Auto-Responder. Did you know you can schedule when you want to start and stop the auto-responder?
1) Log into cPanel for the account to make changes to.
2) Click the icon with Auto Responders. It is under the Mail section.

3) Click on the button “Add Auto Responder”.
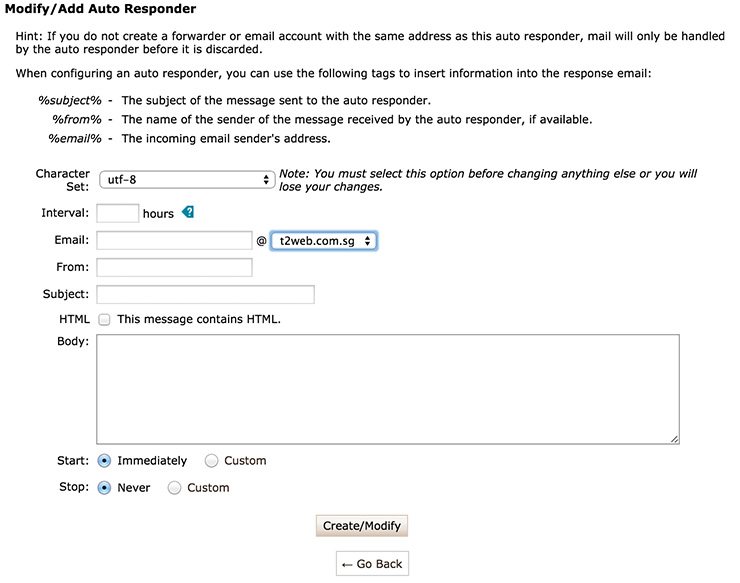
You will then see the fields (you need to fill in) at the auto responder details page.

4) Enter Interval.
Interval refers to the time (in hours) the auto responder will wait before it emails another auto responder. Eg. If you set up an auto responder with the interval of 12, your client first emails you at 9AM. Your auto responder will fire out an auto responder. During 12 hours starting from 9AM, if the same email address continues to send you emails, the auto responder will not send another auto response. The auto responder will only send another auto response to this same email address after 9PM (when your 12-hour interval expires).
5) Fill in the details.
Details for the fields Email, From, Subject, Body are compulsory.
6) Select Start/Stop Times.
You can choose Immediately or Custom. If you select Custom, you can select the date and time you wish for this auto responder to start. Eg. You know you will be on leave from Monday 27 April 2015 9AM and back in office on Thursday 30 April 2015 9AM. Select the Start and Stop times accordingly and when you return to office at 9AM, your emails can come in after 9AM.
6) Create/Modify
Set your auto responder and have a undisturbed happy holiday!

